Roadies (especially road racers) are a curious lot. We obsess over the tiniest details, fret about race preparation, count calories, try to kill ourselves with Machiavellian training schedules, and wear good-luck racing socks. All in the name of gaining half-a-wheel at the finish line or executing the winning breakaway…wait a minute…that’s me, or maybe not.
Who doesn’t want to get something for nothing? In this post I’ll discuss three options for the road racer who wants to increase their speed without burying themselves in a lactate black hole all the time. These ideas (or facts) are provided courtesy of David Gordon Wilson in his wonderful book Bicyling Science, which I had the pleasure to study recently. (See my training references page for the Amazon book link.)
The first point and greatest gain is aerodynamics, and I’ll illustrate the idea. Go in back of your garage and get that 4 x 8 sheet of plywood. Carry it out into the yard and hold it flat to the breeze. Staggering backwards yet? Now hold it horizontal to the ground. Big difference in force isn’t there? It’s the same with your body profile. Time to get low on the bike and save that energy.
Here’s an example:
A road racer with a drag factor (KA) of 0.182 traveling at a speed of 10 m/s (22.4mph) has an aerodynamic drag force of 18.2N (4.09lbf).
Your power cost to overcome aerodynamic resistance at that speed is: 18.2 N x 10 m/s = 182 Watts. Got your attention yet?
How to do this? Getting a tight kit is easy, choose the correct size and/or have some work done at your local tailor/seamstress. Tighten-up any excess or loose material. An aero bike? This one would be a bit more difficult. Before a race, I remove my seat bag and if I choose to carry one, ensure that my water bottle is on the seat post and not the down tube. My Trek 5.2 Madone isn’t going to get any more aero unless I add deeper profile rims. A lot of my cable housing is external so I can’t change much of that either. (Drag is cumulative.)
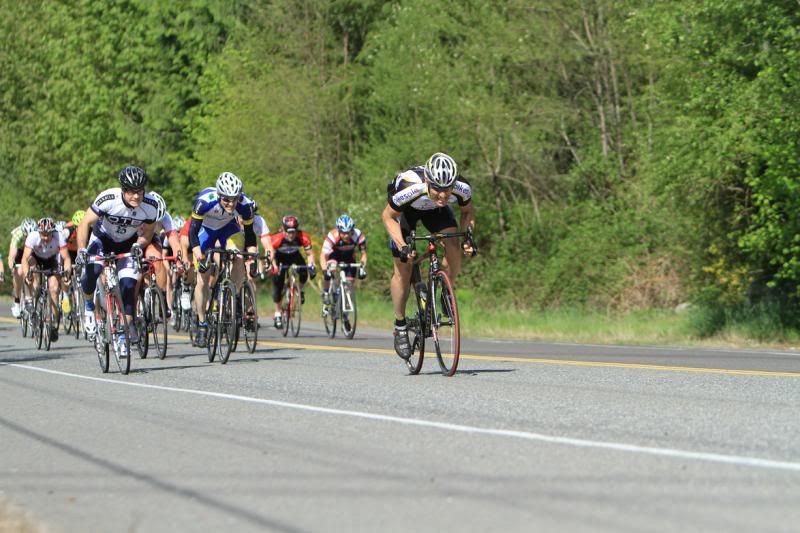
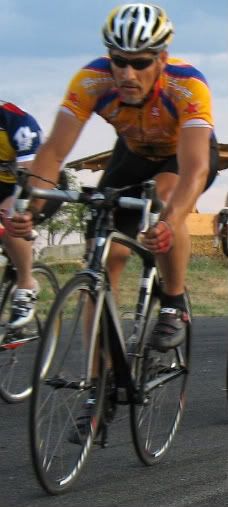
A good body position is where most of the gains can be made. According to Wilson, the lowest drag for body position involves the center of the rider’s back as the highest part with the knees almost brushing the chest (on the upstroke.) That’s great only if you have the flexibility and the tolerance. On the left, I get as low as possible during a criterium lead-out. On the right, Don B. tucks it in tight crossing the finish line:
 |
Additionally, bringing the arms inward pays benefits too. How do you know when your arms are too wide? Start with your measured width from your acromion process’ according to the Trek bike fitting procedure. Your handlebar width shouldn’t be much wider than that. Your LBS’ fitter can help you measure this width. Here’s where the measurement is taken:

For those of you who already have a tight position, close drafting in the pack or pace line is in order.
The second point is training. Wilson says that an increase of 30% in aerobic power is likely with a training program. There are plenty of excellent references available on how to accomplish this one. If you have a power meter, one that I’d strongly recommend is Allan and Hunter’s book, Training and Racing with a Power Meter.
The third and last point is properly pressurized tires of low-loss construction. This one really surprised me as 4%-8% of the total drag could be reduced. What is low-loss construction?
- Non-interwoven fabric in the casing of the tire. Interweaving results in thread rubbing during tire deformation (loss of energy through heat production).
- Sidewall casing threads are formed in a radial and circumferential pattern instead of a bias-ply pattern. (Allows easier toroidal deformation.)
- Thin layers (tread and sidewall) that bend and spring back more easily than thick ones. Thinner threads (higher thread count) is a benefit.
What constitutes proper inflation? One reference suggests that the perfect pressure is that pressure that allows your tire to conform to road surface obstructions with minimal rebound, and prevent pinch-flatting as well. This author suggests around 100PSI for a 165lb rider. The gist here is for a smoother road ride decrease the pressure, and for a faster road ride increase the pressure. You’ll have to experiment with your equipment for your best result.
However, empirical testing from Wilson’s reference shows that the coefficient of rolling resistance doesn’t approach zero as pressure increases. So we can’t just increase the tire pressure arbitrarily.
Cripes, so what’s the bottom line on this rolling resistance stuff? Well, if we accept the comparison table value of 2.4N (0.54lbf) of rolling resistance for a road-racing bicycle, that resistive force will very soon be superseded by the aerodynamic resistive force (from above) as our road speed increases.
Here’s an example:
From the Speed vs. Power table we see that it takes about 215 W to travel 10 m/s (22.4mph) in still air on level ground for a road-racing bicycle. 215 W less 182 W (less some wattage for rolling resistance) leaves less than 33 W. Most of our effort (~82%) goes to pushing air!
In closing, the idea then is to:
- Adjust your tires–find the right tire pressure that lets you roll smooth and fast.
- Snug up your kit–don’t have anything flapping around and creating drag.
- Learn and train–maximize your training time and effort in order to have more wattage available for use.
- Tighten your body position–find ways to reduce your profile in respect to the airstream.
I enjoy learning topics that will help me go faster with less effort. I hope you have enjoyed it as well. See you next season.


Recent Comments: